Get started
This short introduction to Glasshouse will show you some of the basics for using the Glasshouse, such as:
- the Glasshouse Journal
- synchronising with your Revit model
- getting data from Glasshouse to Revit.
The Glasshouse Journals
The heart of Glasshouse is the Journals which can be used to organise building elements, rooms/spaces, systems and anything else.
The journals can be found in the navigation pane in the left side of any glasshouse page.
The journals are divided into different categories based on on the journal type you need, and each journal type can have multiple “view”, that allows you to view, sort, filter and organise the journal to fit a specific purpose.
As a basis all project starts with the View “Building Elements”.
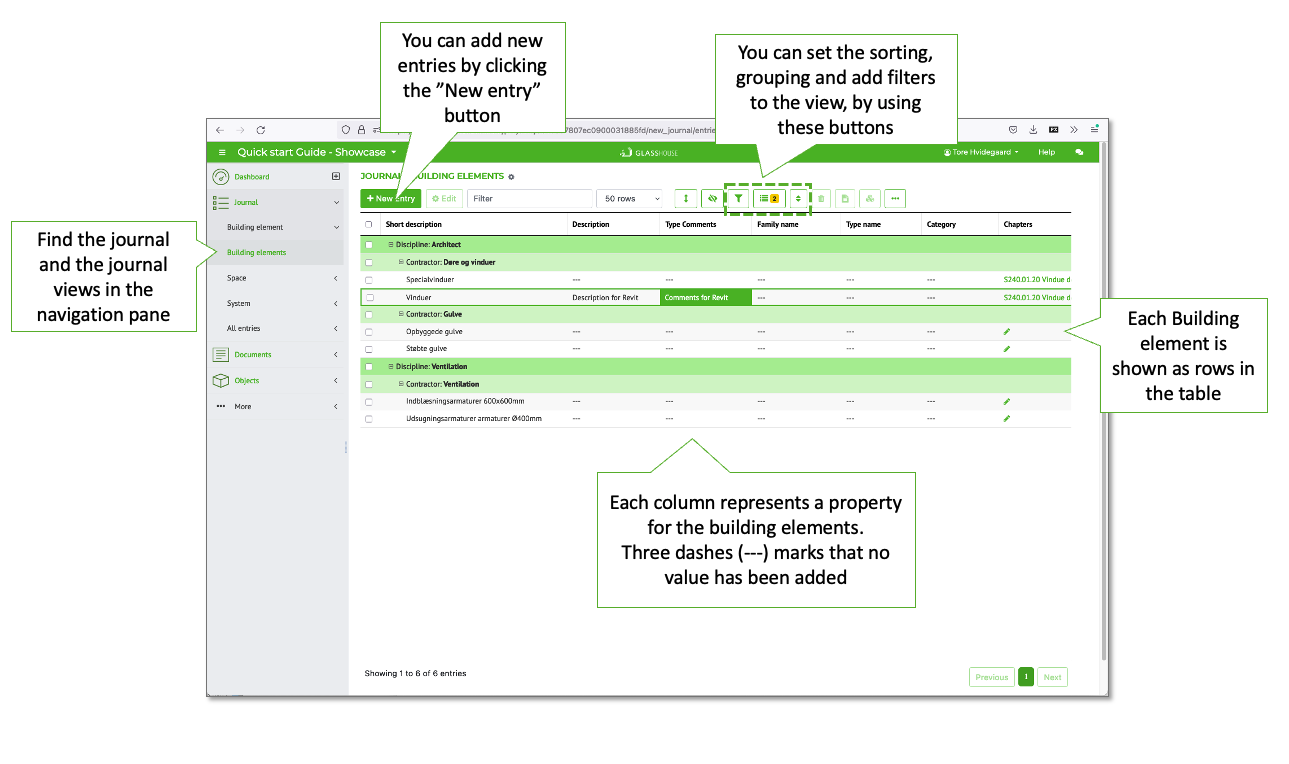
In this view contains the building elements that has been added to the project, and you can quickly get an overview of some of the dat that has been added to the elements, if they are linked to any objects in a BIM model, if they are linked to a specification etc.
You can easily create a new building element by clicking the “New entry” button, or add data to each building element in the table, by navigating to the column and hitting the “Enter” button.
Linking Revit with Glasshouse
To work with Glasshouse in Revit you need the Glasshouse Revit plug in, that can be downloaded from the Download page.
The plug-in gives you a new “Glasshouse” tab, with a number of functions.
In this quick intro we will only use a few: linking a project, tagging and sending data back and forth between Glasshouse and Revit.
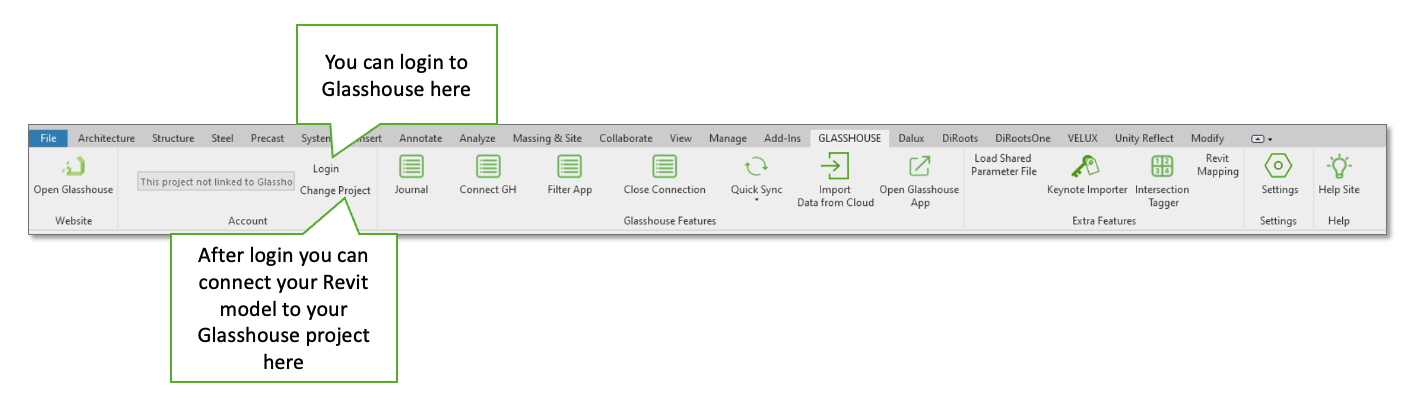
Start by logging in.
When logged in click “Change Project”, and choose your Glasshouse project from the dropdown.
When hitting “OK” your Revit project and Glasshouse projects gets linked, and you can begin to communicate between Revit and to Glasshouse.
Tagging objects in Glasshouse
We can create the relations between objects in our Revit model and building elements in the Glasshouse journal in several ways.
Either we can manually “tag” the objects, or we can set up and advanced automation in Glasshouse.
For this short intro we will use the simple “tag” feature, that tags the revit objects with the corresponding Glasshouse building elements.
For this we will use the Journal directly in Revit, which we can open by clicking “Journal” button in the Glasshouse Ribbon.
The Journal window gives you the option of selecting which journal view to use in the top, and after that show the journal view as set up in Glasshouse, with same rows and columns.
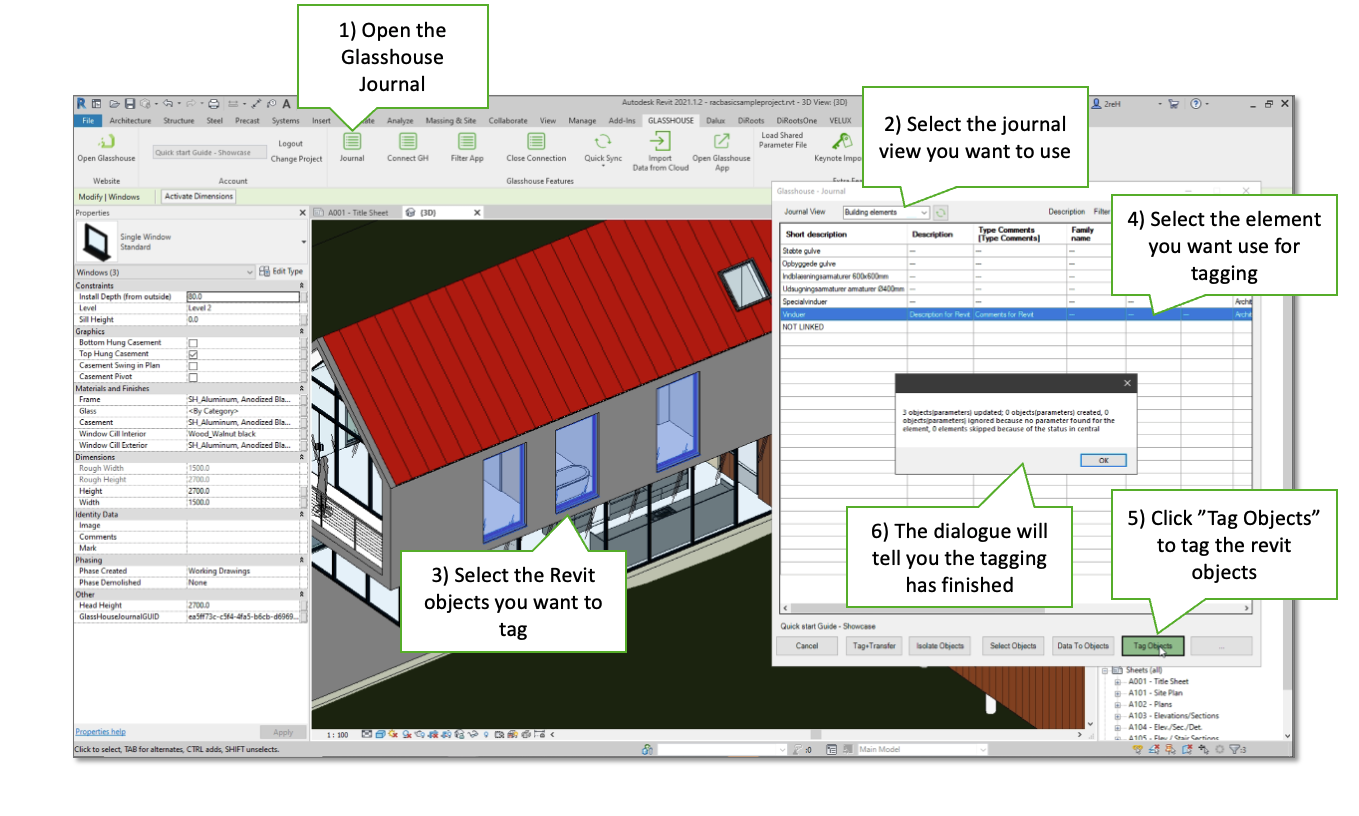
The tagging process has 3 simple steps:
- Select one or more objects in Revit that you wish to link to the same Glasshouse Elements
- Select the Glasshouse element in the Journal window in Revit
- Hit the “Tag objects” button below the journal window.
You should now receive a message telling that the tagging is successful.
TIP: You can always see which Glasshouse Building Element an objects is linked to, by selecting the object in Revit. The matching Building element will now be highlighted in the journal window.
Upload your Revit model
For uploading your Revit model to Glasshouse you now have a number of options.
But for now, Let’s keep it simple.
In the Glasshouse Ribbon in Revit click “Quick export”, and the export will commence. You will see a progress dialogue, and a succesfull message when all is done.
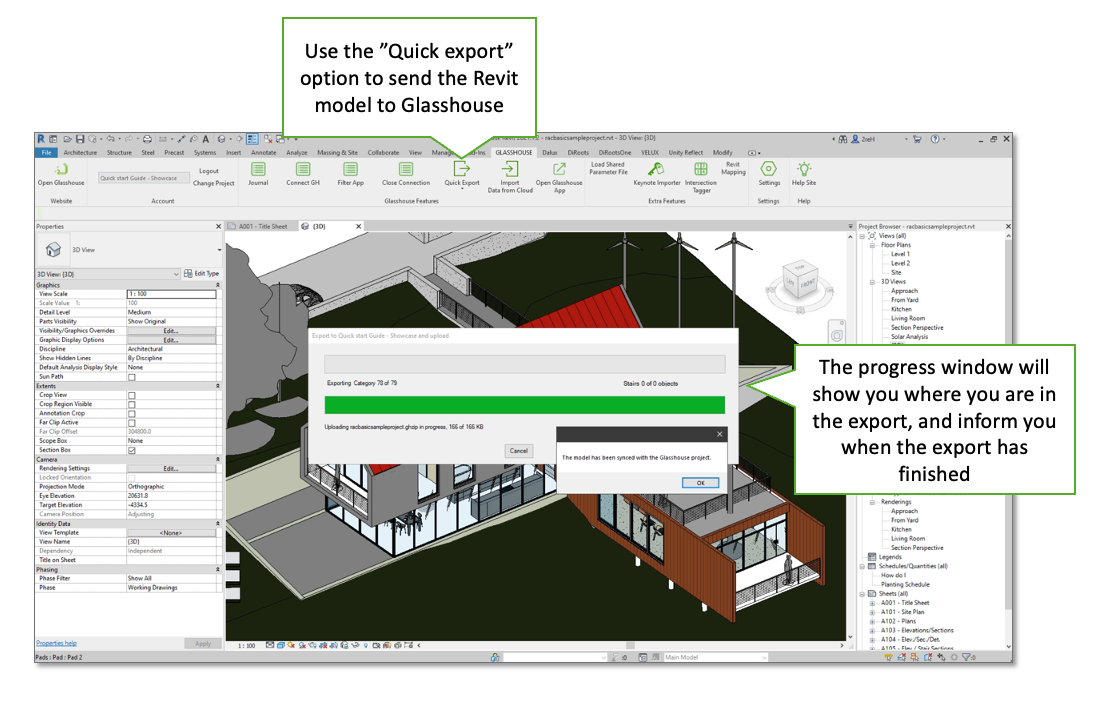
Your model data is now in Glasshouse. As a default most object categories are exported, with most of their parameters.
You can see all the objects in the “Objects” section in the Navigation pane in the left side of the Glasshouse website. As with the journal you have the option to set up different “view” using filters etc – like the Revit schedules, but with fewer limitations.
When we return to the journal, and take a look at the building elements we used for tagging in Revit, we will now see a change.
The BIM object count has changed, and some of the data will be show directly in the table under the corresponding parameters.
The font of the values in the table might also change, some gets bolded, some might be red – this is to show how data in Glasshouse match the data from the Revit model – but more on that later.
Import data from Glasshouse to Revit
Looking at the Building Elements in the Glasshouse Journal we might want to make some changes or add some data, and then we want to make sure that this data is also available in our Revit model.
To do this, we just add the values directly in the table, in the column that matches the Revit parameter.
For instance we’ll change the “Description” column in Glasshouse, and that value will be transferred to the “Description” parameter on all tagged Revit objects.
Please note that Revit will only be able to receive data if the tagged object actually has a matching parameter.
Before you can get the data from Glasshouse to revit, you need to specify which view (or views!) you would like to send data from.
You do this under “Settings” in the Glasshouse Ribbon, and choosing the “Revit Mapping” tab in the dialogue.
Here you be able to set the journal views you wish to use for the sync. “Building elements” are chosen as default, but you can choose or add any view.
When you are ready to transfer the data we’ll hit “Import from Cloud” in the Glasshouse Ribbon. We will then get prompted
Please note that if you are using Revit’s collaboration feature and a “central model” Glasshouse will prompt you for a central model sync. This is just an option, choosing “yes” or “no” will still complete the import.
You will now be prompted which Journal view is going to be used – the default is “Building elements”, and you can hit “Run” to start the transfer.
A progress dialogue will now show…
…and when this has finished the data from Glasshouse is now also in Revit.
Next steps
This completes the quick start guide for the workflow between Glasshouse and Revit.
There are several next steps you can take from here, and we have a longer guided tour in these help pages to help you along. For now this is only available in Danish.
But with the show features you can go a long way, and here are some things you can test:
- Try tagging some objects in Glasshouse, and then try to refresh the Glasshouse journal in your Browser.
See how fast it updates the connections. - Does your model contain rooms of systems.
Then try to make some rooms or systems in the corresponding glasshouse views.
Then you can tag and transfer data just ike with the building elements. - Try creating more journal views in glasshouse, or modify any of the existing views. Try adding more columns, group elements by certain parameters, or exclude some elements by using the filter.
This will help you get different types of overview, and also make it possible to control which data is transferred to Revit.
And are you having trouble with this Quick start guide?
Then please leave a comment below or write to hello@glasshouse.com and we’ll help you on the way.